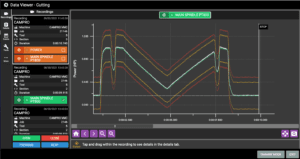
Caron Engineering introduces an advanced signature analysis feature for CNC machining, designed to precisely monitor the cutting forces experienced by tooling throughout the cutting path. This innovative tool monitoring capability has been integrated into our TMAC (adaptive tool monitoring system) and DTect-IT (CNC sensor analysis system) products. Signature analysis is critical for enhancing the reliability and efficiency of various CNC cutting processes. For example, constant surface speed cutting operations have traditionally been difficult to monitor due to fluctuating spindle RPMs as material is removed. Traditional methods often lead to unreliable results, making this supplemental tool monitoring technology a game-changer.
Signature analysis offers superior monitoring of cutting processes where material diameter fluctuates throughout the cut. As the material diameter changes, the RPM adjusts, causing sensor fluctuations that are unrelated to the tooling. Signature analysis software addresses this by learning the entire cutting path, or “signature,” using a variety of sensors. The user defines upper and lower boundaries around this signature, creating a “window” that the signature must stay within to be considered a valid cut. If the signature exceeds these boundaries, an alarm is triggered. Since this is a time-based analysis, accurate timing in relation to the cutting start time is essential.
By incorporating signature analysis into CNC machining, manufacturers can expect a host of benefits, including easier programming, consistent workpiece finishes, extended tool life, and optimized machining times that result in higher throughput for operators.
In manufacturing, this technology is particularly useful for facing and turning operations on a CNC lathe, where RPM adjustments maintain a proper chip load as material thickness changes. For instance, as a lathe begins cutting at the part’s original diameter and removes material, the diameter gradually decreases. This leads to RPM fluctuations that are challenging to monitor with traditional tool monitoring methods. With signature analysis integrated into CNC machines, these cuts can be closely monitored to ensure optimal surface finish by learning the cut signature and setting appropriate boundaries.
“Signature analysis is not limited to constant surface speed cutting; it can also be applied to other aspects of machine tool monitoring. For instance, in cases where material is missing during a cut, traditional technologies may only detect this early in the process. Signature analysis, however, allows us to identify missing material at any point during the cut,” said Rob Caron (PE), President of Caron Engineering.


